Hydrangeas are among the most beloved flowering shrubs, famous for their lush, cloud-like blooms in shades of pink, blue, and white. But even the most devoted gardener can face a heartbreaking sight — drooping leaves, brittle stems, and flowers fading before their time. If your hydrangea looks like it’s on its last leg, don’t panic just yet. These plants are resilient, and with the right care, you can often bring them back from the brink.
In this comprehensive guide, you’ll learn how to diagnose the problem, revive your hydrangea, and restore it to full, blooming glory.
Step 1: Understand Why Your Hydrangea Is Dying

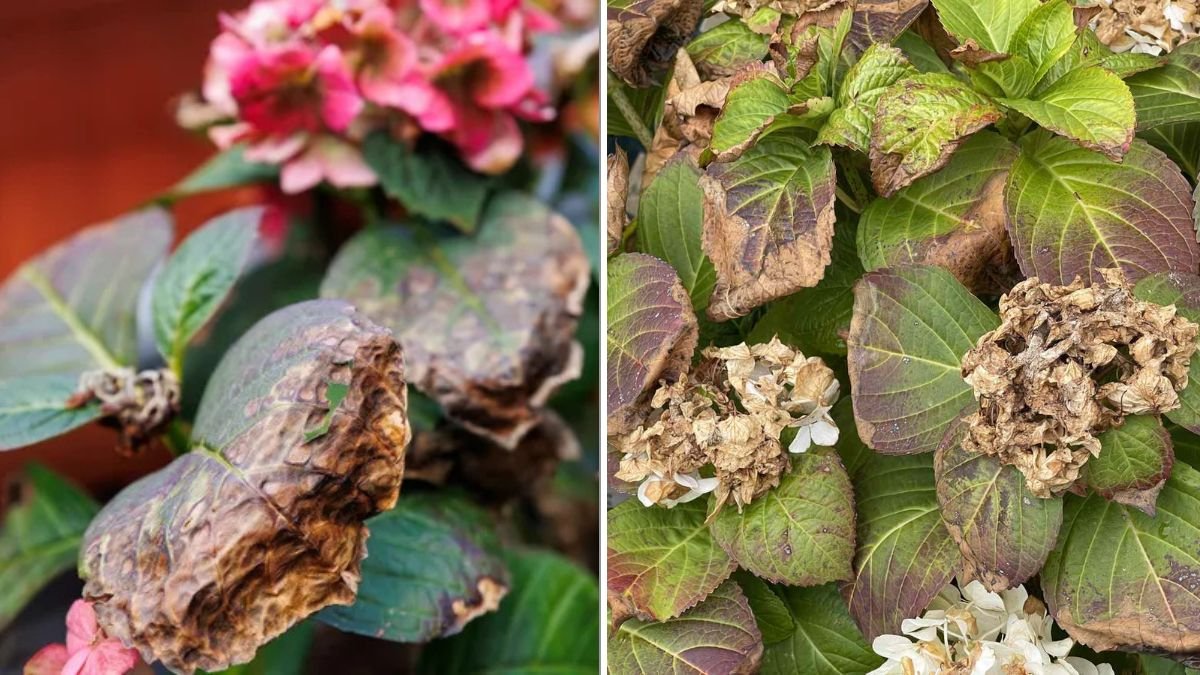
Before you can fix the problem, you have to understand what’s causing it. A “dying” hydrangea usually shows one or more of the following symptoms:
- Wilting or drooping leaves even when the soil is moist.
- Brown or crispy leaf edges.
- Yellowing leaves that drop prematurely.
- No blooms or small, weak flowers.
- Blackened stems or soft, rotting areas.
Each of these signs points to a different issue, so the first step is identifying what’s really going on.
Here are the most common causes of hydrangea decline:
1. Water Stress (Overwatering or Underwatering)
Hydrangeas love moisture — but too much or too little can both spell disaster.
- Underwatering: The leaves wilt, curl, and dry out.
- Overwatering: Leaves turn yellow, and roots begin to rot.
Hydrangeas need consistently moist soil that drains well — not soggy or bone-dry.
2. Too Much Sun or Heat
Most hydrangeas prefer morning sun and afternoon shade. When exposed to full, scorching sun all day, their leaves can scorch and their flowers fade quickly.
3. Poor Soil or Nutrient Deficiency
If your soil is too compacted, alkaline, or nutrient-poor, hydrangeas struggle to absorb what they need to grow.
4. Frost or Cold Damage
Late spring frosts can kill tender new shoots, especially on bigleaf (Hydrangea macrophylla) or oakleaf (Hydrangea quercifolia) varieties.
5. Pests or Disease
Common culprits include aphids, spider mites, powdery mildew, and root rot — all of which can cause decline if left unchecked.
Step 2: Diagnose the Root Cause

Now that you know the possible reasons, let’s pinpoint the exact cause by observing your plant closely.
| Symptom | Likely Cause | What To Do |
|---|---|---|
| Wilting even with wet soil | Root rot or poor drainage | Improve drainage, remove affected roots |
| Crispy, dry leaves | Underwatering or too much sun | Water deeply, provide partial shade |
| Yellowing leaves | Overwatering or poor soil | Check soil moisture, aerate, and adjust watering |
| Blackened stems | Fungal rot or frost damage | Prune damaged stems and disinfect shears |
| Leaves with powdery coating | Powdery mildew | Improve air circulation, apply fungicide |
| No blooms | Over-pruning or lack of nutrients | Feed with balanced fertilizer and prune correctly |
Once you’ve identified the cause, you can move on to the rescue phase.
Step 3: Fix Watering Problems
Water management is the #1 factor in hydrangea health. These plants crave consistent moisture, but they can’t tolerate sitting in waterlogged soil.

How To Fix Underwatering:
- Deeply water your hydrangea 2–3 times per week.
- Soak the soil thoroughly, ensuring water penetrates 8–12 inches deep.
- Mulch around the base with compost or bark to retain moisture.
- Water in the morning so the leaves can dry before evening.
How To Fix Overwatering:
- Check for soggy soil — if it smells foul or feels heavy, your roots may be suffocating.
- Gently dig around the roots to inspect them. Healthy roots are firm and white; rotted ones are brown and mushy.
- Prune away rotted roots and replant in fresh, well-draining soil.
- Elevate your plant slightly or amend the soil with sand and compost to improve drainage.
Pro Tip: Hydrangeas in pots dry out faster, so monitor them more often than those planted in the ground.
Step 4: Adjust Sunlight and Temperature

Hydrangeas prefer bright, indirect light or morning sun with afternoon shade. Too much sun scorches leaves; too little causes weak growth and poor blooms.
Ideal Light Conditions by Variety:
- Bigleaf & Mountain Hydrangeas: Morning sun, afternoon shade.
- Panicle & Smooth Hydrangeas: Can handle more sun, especially in cooler climates.
- Oakleaf Hydrangeas: Prefer dappled light or partial shade.
If your plant is wilting under harsh sun, provide temporary shade using a patio umbrella, shade cloth, or nearby taller plants.
In winter or early spring, if frost threatens new shoots, cover your hydrangea with a breathable frost cloth overnight to prevent damage.
Step 5: Improve Soil and Feeding
Hydrangeas thrive in rich, well-drained, slightly acidic soil (pH 5.5–6.5). Poor soil can lead to weak roots, pale leaves, and few blooms.
How To Improve Poor Soil:
- Work compost or organic matter into the top 12 inches of soil.
- For clay soil, add coarse sand or fine bark to loosen it.
- For sandy soil, add compost or leaf mold to retain moisture.
Fertilizing:
Use a balanced, slow-release fertilizer (like 10-10-10) in early spring and again in mid-summer. Avoid overfertilizing — too much nitrogen promotes leafy growth but reduces flowering.

Optional Tip:
- For blue blooms, acidify the soil using aluminum sulfate or coffee grounds.
- For pink blooms, add lime to raise soil pH.
Step 6: Prune Correctly

Improper pruning is one of the most common reasons hydrangeas look “dead.” Different hydrangea types bloom on either old wood (last year’s stems) or new wood (this year’s growth). Prune at the wrong time, and you might cut off future blooms.
Pruning by Type:
- Bigleaf (H. macrophylla) – Prune immediately after flowering (late summer).
- Oakleaf (H. quercifolia) – Prune after flowering; blooms on old wood.
- Panicle (H. paniculata) – Prune in late winter or early spring; blooms on new wood.
- Smooth (H. arborescens) – Cut back to about 6 inches above the ground in early spring.
General Pruning Tips:
- Remove dead or weak stems anytime.
- Sterilize pruning shears before and after cutting.
- Don’t prune in fall or early spring unless you’re sure which variety you have.
Step 7: Combat Pests and Diseases
Even healthy hydrangeas can fall prey to pests or fungal diseases if stressed.
Common Pests:
- Aphids: Cause distorted leaves and sticky residue.
- Solution: Spray with neem oil or insecticidal soap.
- Spider Mites: Create fine webs under leaves.
- Solution: Mist leaves regularly and use a miticide.
- Scale Insects: Look like small bumps on stems.
- Solution: Wipe with alcohol-dipped cotton swabs or apply horticultural oil.
Common Diseases:

- Powdery Mildew: White coating on leaves; thrives in humidity.
- Solution: Improve air circulation, prune dense growth, and apply a fungicide.
- Leaf Spot: Brown spots caused by fungus or bacteria.
- Solution: Remove affected leaves and avoid overhead watering.
- Root Rot: Due to poor drainage.
- Solution: Replant in fresh soil and water carefully.
Step 8: Encourage Recovery and Regrowth

After you’ve addressed the problem, help your hydrangea recover fully.
1. Mulch Generously:
Apply a 2–3 inch layer of mulch to conserve moisture, regulate soil temperature, and reduce weed competition.
2. Water Wisely:
Water deeply once or twice a week, depending on weather and soil. Avoid frequent shallow watering.
3. Feed Lightly:
Give your hydrangea time to recover before applying fertilizer. After 4–6 weeks of stability, resume gentle feeding.
4. Be Patient:
It can take several weeks — even months — for your hydrangea to show signs of revival. New buds or green shoots at the base are a good sign of recovery.
Step 9: Prevent Future Problems
Once your hydrangea recovers, keep it thriving with a few proactive measures:
- Water consistently — avoid both extremes of dryness and sogginess.
- Mulch annually to maintain moisture and temperature.
- Feed twice a year with a balanced or hydrangea-specific fertilizer.
- Monitor for pests and diseases regularly.
- Adjust pruning timing based on your variety.
A little consistent care goes a long way in keeping your hydrangea lush, green, and full of blooms year after year.
Final Thoughts: Hydrangeas Are Survivors
Don’t be too quick to give up on a hydrangea that looks lifeless. Beneath those dry leaves and brittle stems often lies a living root system waiting for a second chance.
With proper watering, sunlight, pruning, and soil care, most hydrangeas bounce back beautifully — sometimes even stronger than before.
So before you replace that struggling shrub, give it the attention it deserves. Because with a little patience and care, your “dying” hydrangea could soon be bursting with color again — a living reminder that even the most faded blooms can flourish once more.