
Sweet potatoes are one of America’s favorite comfort foods — hearty, nutritious, and versatile in the kitchen. But what if you could grow your own sweet potatoes right on your terrace or rooftop?
That’s exactly what this gardening experiment set out to test. With just a few containers, some healthy slips (sweet potato sprouts), and a sunny spot, it turned out to be one of the most rewarding small-space gardening projects ever.
Whether you live in an apartment, townhouse, or suburban home, this simple method proves that you don’t need acres of land to harvest pounds of delicious, homegrown sweet potatoes. The results of this terrace gardening experiment were truly surprising — and here’s how you can do it too.
Why Grow Sweet Potatoes on a Terrace?

Sweet potatoes are usually thought of as ground crops, but they’re actually perfect for container and terrace gardening. Here’s why:
- They Thrive in Heat: Sweet potatoes love warm weather and sunlight — exactly what your terrace provides.
- Easy to Grow in Containers: With deep, loose soil, they grow just as well in pots or grow bags.
- Low Maintenance: Once established, they need minimal care and water.
- Space Efficient: The vines can trail along railings or hang beautifully over the edges.
- Nutritious and Delicious: Packed with vitamins A and C, fiber, and antioxidants.
This experiment was designed to test how productive a small rooftop garden could be — and the results were beyond expectations.
What You’ll Need for the Experiment
You don’t need much to get started — just a few simple gardening essentials:

Supplies List
- Sweet potato slips (young sprouts from mature sweet potatoes)
- 3–4 large containers or grow bags (at least 12–18 inches deep)
- Rich, loose potting mix (well-draining and slightly sandy)
- Organic compost or fertilizer
- Watering can or hose
- Sunny terrace or rooftop spot (minimum 6 hours of sunlight daily)
Optional: Trellis or netting to guide the vines as they grow.
Step-by-Step Guide: The Terrace Sweet Potato Experiment
Step 1: Preparing the Slips
Sweet potatoes are grown from “slips,” which are shoots that sprout from a mature tuber. You can buy ready-to-plant slips from a garden center or grow them yourself.
To grow your own slips:
- Place a healthy sweet potato half-submerged in a glass of water, supported by toothpicks.
- Within 2–3 weeks, you’ll see sprouts emerging.
- Once the shoots are about 6 inches long, gently twist them off and place them in water until roots form.
When roots are about an inch long, they’re ready for planting!
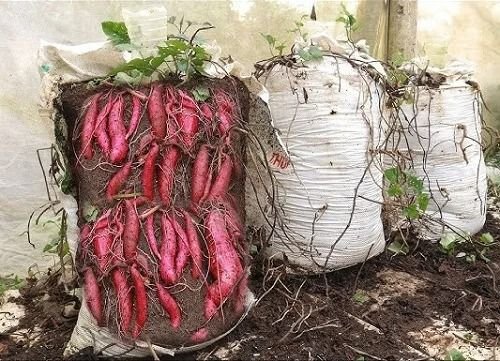
Step 2: Preparing the Containers
For terrace gardening, choose large containers or grow bags that are at least 18 inches deep to allow the tubers to expand underground.
Fill each container with a mix of:

- 60% potting soil
- 30% organic compost
- 10% sand or coco peat for drainage
Mix well and water lightly before planting. Sweet potatoes prefer loose, aerated soil — compact soil can restrict root growth.
Step 3: Planting the Slips
Plant each slip about 4–5 inches deep into the soil, leaving the top leaves above the surface. Space each plant 10–12 inches apart if using large planters.
Water gently to help the roots settle in. Place your containers in a sunny area of the terrace where they’ll receive at least 6–8 hours of sunlight daily.
Step 4: The Growth Phase
Over the next few weeks, your terrace will transform into a lush green space as the sweet potato vines spread out.
- Water regularly — about 2–3 times per week. The soil should stay moist but not soggy.
- Fertilize once a month with organic compost or a balanced vegetable fertilizer.
- Train the vines to climb or trail — they can be guided along railings, trellises, or left to cascade beautifully.
You’ll notice how quickly they grow — a clear sign that they love terrace conditions.
Step 5: Flowering and Root Development
Around 8–10 weeks after planting, small purple flowers may appear — a beautiful sight and a good sign that tubers are forming below the soil.

At this stage:
- Reduce watering slightly to encourage root growth.
- Check for pests — though sweet potatoes are relatively pest-resistant, a quick inspection helps keep vines healthy.
The experiment showed that even under rooftop conditions, the plants produced thick, vigorous vines — a good indicator of strong root systems below.
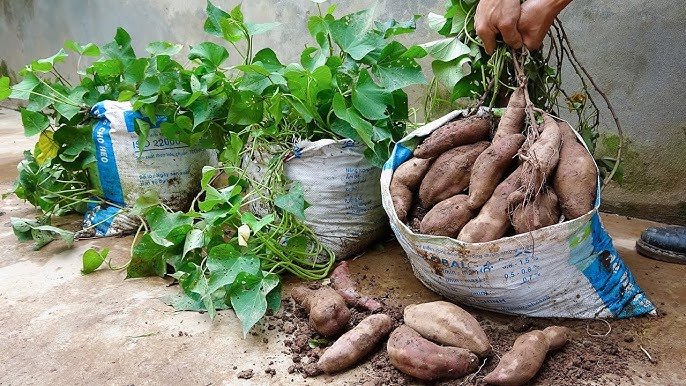
Step 6: The Harvest — The Big Surprise!
After about 100–120 days, it’s time for the exciting part: harvesting.
When the leaves begin to turn yellow and wilt slightly, the tubers are mature. Gently dig into the soil with your hands or a small trowel, taking care not to damage the roots.
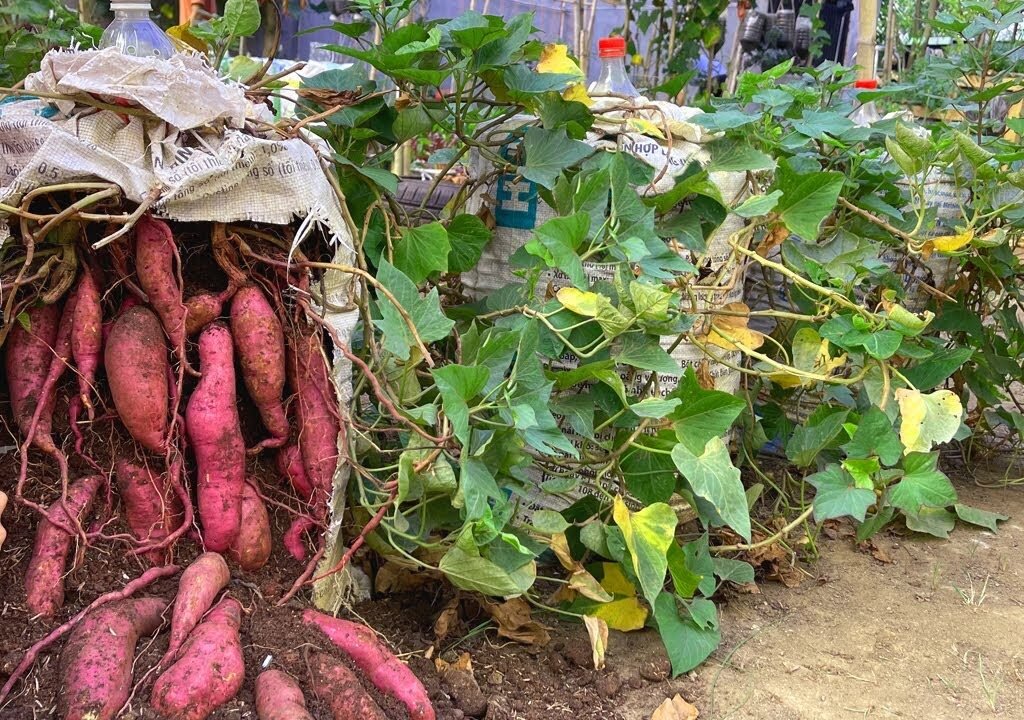
What came out was the biggest surprise of the experiment — each container produced 5–8 healthy, plump sweet potatoes!
Even in limited terrace space, the harvest was abundant — proving that sweet potatoes can thrive in containers just as well as in the ground.

Results of the Terrace Sweet Potato Experiment
Here’s what the experiment revealed:
| Factor | Observation |
|---|---|
| Growth Rate | Excellent – vines grew quickly in full sun |
| Water Requirement | Moderate – 2–3 times per week was sufficient |
| Yield per Container | 5–8 medium to large sweet potatoes |
| Pest Resistance | Very high – minimal issues |
| Space Efficiency | Outstanding – grew vertically and horizontally |
| Taste Quality | Sweeter and fresher than store-bought ones! |
This confirmed that terrace-grown sweet potatoes are not only feasible but highly productive with minimal input.
Tips for Maximum Terrace Yield

If you’re inspired to try this yourself, here are some pro gardener tips for success:
- Start in Late Spring: Sweet potatoes love warmth. Plant slips after the last frost.
- Use Black Grow Bags: They retain warmth and boost growth.
- Prune the Vines: Trim occasionally to redirect energy to the tubers.
- Rotate Containers: Move pots around for even sunlight exposure.
- Harvest Carefully: Handle tubers gently to prevent bruising.
- Cure After Harvest: Let the sweet potatoes dry in a warm, shaded area for 7–10 days to enhance sweetness.
The Benefits of Terrace Gardening
This experiment didn’t just produce sweet potatoes — it transformed a simple terrace into a thriving green sanctuary.
Here’s why more Americans are switching to terrace and rooftop gardening:
- Eco-Friendly: Reduces carbon footprint and heat on rooftops.
- Aesthetic Appeal: Lush green vines add natural beauty to your space.
- Homegrown Health: 100% organic, pesticide-free vegetables.
- Efficient Water Use: Containers require less water than ground beds.
- Therapeutic Value: Gardening helps reduce stress and boosts mental well-being.
It’s sustainable living made simple — and it starts right above your head.

Common Mistakes to Avoid
- Overwatering: Too much water can cause root rot. Keep soil lightly moist.
- Heavy Soil: Dense soil restricts tuber growth; always use loose mix.
- Lack of Sunlight: Sweet potatoes need full sun to thrive.
- Harvesting Too Early: Wait at least 100 days for mature, sweet tubers.
A little patience goes a long way — sweet potatoes reward you generously if you give them time.
The Sweet Takeaway
This terrace gardening experiment proved one thing — you don’t need farmland to grow a bountiful crop of sweet potatoes. With just a few containers, sunlight, and care, you can produce a surprising harvest of this beloved root vegetable right from your rooftop.
Not only is it easy and cost-effective, but the joy of pulling fresh, homegrown sweet potatoes from your own terrace is truly priceless.
So if you’ve been thinking about trying something new this gardening season, give this sweet potato terrace experiment a shot. The results might surprise you — just like they did for this gardener.